
I started crocheting years ago, my mother taught me how. She's amazing what she makes, scarves, warm afghans, and ponchos. I never really had the patience to keep up with stitch count back then. I guess it just took me time to slow down. This is a little Jack o'lantern I made and have named Little Cinderella! I am hoping to make white or cream colored friend for Little Cinderella named Lumina. I can't wait to go to the Pumpkin Patch and pick out beauty for this year. I think my Halloween costume might be a bit Pumpkin inspired too we shall see!
Now for the pattern:

Amigurumi Little Cinderella Pumpkin Pattern
Supplies and Tools
Pumpkin Worsted Weight Yaen
Chocolate Brown Worsted Weight Yarn
Light Green Worsted Weight Yarn
Black Worsted weight Yarn
3mm or 3.75mm crochet hook
Poly fill
Yarn needle.
Stitch marker or Scrap yarn
Abbreviations and Symbols
sc = single crochet
stc = stitch count
ch = chain
sc2tog = single crochet two together, this meant as a decrease
sl st = slip stitch
rnd =round
* = repeat
Row = Row
Pattern notes: I used Impeccable worsted weight yarn. You also do not have join rounds if you prefer working in spirals, that is up to the individual. Also Gauge of the hook does not matter unless you looking for making small pumpkin like mine, if not jsut make sure you yarn and hook match in size.
Pattern;
Body
Rnd 1 : With pumpkin yarn ch 2, sc 6 in second ch from the hook. join with sl st [stc 6]
Rnd 2 :ch 1, sc 2 in each sc,join with sl st, [stc 12]
Rnd 3 :ch 1, *sc in each sc, then 2 sc in the next sc*, join with sl st [stc 18]
Rnd 4 :ch 1, *sc in the next 2 sc, then 2 sc in the next sc* join with sl st [stc 24]
Rnd 5 :ch 1, *sc in the next 3 sc, then 2 sc in the next sc* join with sl st [stc 30]
Rnd 6-10 : ch 1, sc in each sc, join with sl st [stc 30]
Rnd 11: ch 1, *sc2tog, sc in the next 3* join with sl st [stc 24]
Rnd 12: ch 1, *sc2tog, sc in the next 2* join with sl st [stc 18]
Rnd 13: ch 1, *sc2tog, sc in the next 1* join with sl st [stc 12]
Stuff with poly fill
Rnd 14: ch 1, *sc2tog all around* [stc 6]
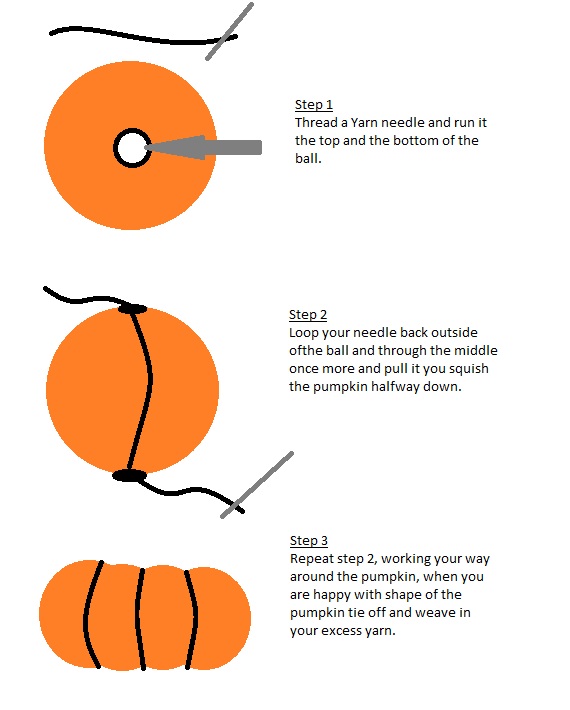 |
| To enlarge Diagram click here |
Stem
Rnd 1 : With Chocolate Brown yarn ch 2, sc 6 in second ch from the hook. join with sl st [stc 6]
Rnd 2-3: sc in each sc [stc 6]
Note: The stem you do not have join rounds. simply work in spiral.
Leaf
Row 1: ch 2, 2 sc in second ch from the hook.[stc 2]
Row 2: ch 1, sc in next sc, then 2 sc in next sc, [stc 3]
Row 3: ch 1, sc in next sc [stc 3]
Row 4: ch 1, sc2tog , sc [stc 2]
Row 5: ch 1 sc [stc 1]
Bind off and weave in
To make the body look like a pumpkin refer to the Diagram. Lastly attach all parts and embroider your own face on with black yarn, or even use beads for eyes. you leave him blank and make a few for nice table arrangement!
I hope this was easy to understand I've never written a crochet pattern before. Thee is plethora of information of how read patterns and how to crochet, and a lot of sites that offer some very awesome patterns out there! If you have any questions leave comment below
I am working on making a mask for a Halloween give away! See you next Time!
Dream Big!
Sorianna
Love him!!!!!
ReplyDeleteAwww Thank you!
ReplyDelete