Every year I make tons of sweets for the Halloween, I can't help it, something about that cool crisp air. It just sparks the imagination. This year I wanted to make Cake pops. Cake pops have many names, cake balls, cake truffles, the list goes on!
These are made with Red Velvet cake. The process is very simple, but its also time consuming so if you are looking to make these, make sure you have a few hours set aside. I'll be posting my recipe and tips I learned from scouring the web.

This year for Halloween I was genuinely stumped on a costume I like to come up with something original or work from something I can my own flair to. I was a Victorian Marionette doll this year. I made a Marionette from balsa wood and ribbon. I attached chains at the ends and clipped it into lace back blazer. I also wore a striking pink and blonde wig made by California Costumes. I found it at this Halloween and Magic shop. The Shop is called Mr.G's Magic and Costumes and they have been there for 14 years. They had a great selection of costumes and wigs. I liked that I was able to try on my wig before I purchased it. The staff was also wonderful. Very helpful and courteous I hope to be back soon.
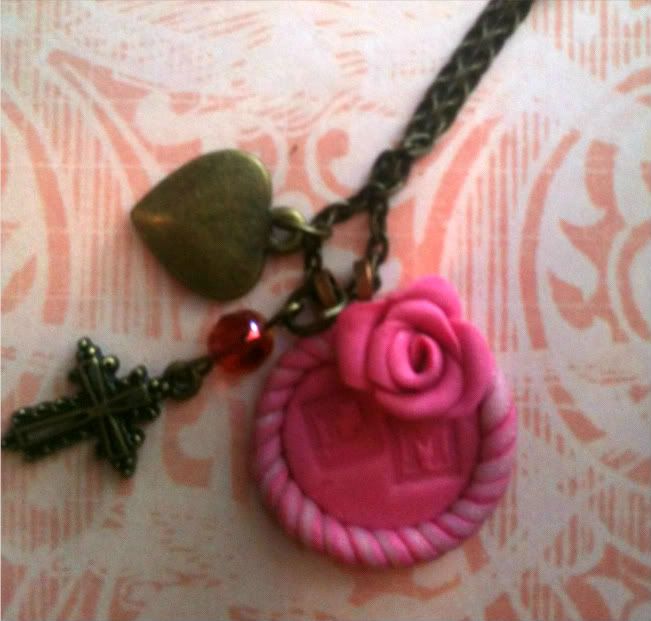
For makeup I used Urban Decay's Book of Shadows Volume II. I decided to go with a sorta of Harlequin Doll look. I think it came out nicely. My necklace was made from sewing a bow onto ribbon and adding a secondary bow with a cross charm. As for costume its self I wore my lace blazer, silver blouse and black peasant skirt with platform peep toe pumps by BCBG. I used my headband from past post on my wig. Its great to make a costume from new stuff as well old. I hope to next time get some white face paint and paint my own mask on.

Of course Halloween is not complete without a Jack o'Lantern to ward off evil for another year. My sister bought me the largest Cinderella pumpkin she could find. It two me hours to carve and I think I scooped about 10lbs of pumpkin guts out. I was making this year's pumpkin a tribute to the Pumpkin King, Jack Skellington. I think he came out tiny bit sinister but I liked it. Pumpkin Carving has long tradition in my family I learned from my father who has such amazing ideas, which always inspired me.
Now for the Tasty recipe!
Red Velvet Cake Devil Pops
Ingredients
1 box Red Velvet Cake or 1 Red Velvet Cake from Scratch
1 bag Wilton Dark Cocoa Candy melts
1 bag White Chocolate Chips.
2/3 cup cream cheese frosting store bought or made from scratch [ I made mine]
Lollipop sticks
Styrofoam or Box top with holes poked in it to let cake pops dry.
Optional:
Lollipop bags
ribbon
Small pumpkin
Instructions
1. Bake the cake according to box or recipe and let cool completely. Very important the cake is completely cool.
2, Crumble the cake into a bowl with two forks. It look sorta like fluffy couscous.
3. Add frosting, now you may have a little more, but mix the icing into you cake crumbs until you get a play dough texture.
4. Roll your cake into balls and place on baking sheet. When cake is all used up place Cake balls in freezer for about 30 mins. And begin melting chocolate in double boiler.
5. Remove the cake balls from the freezer and dip the ends of each of lollipop stick in chocolate then into ball. Once ever ball has a lollipop stick put back in freezer for an 1 hour. The reason behind is you want the stick to be able to adhere to the cake ball.
6.Take the cake pops out and dip in remaining chocolate . Go slowly and take your take time, one you dip chocolate add two white chocolate chips and slip into the Styrofoam or box top and let cool..
7, Serve and EAT! As for my display I used a small pumpkin that I cut with a knife and then stabbed with a bamboo skewer. After that I just popped the Cake pops in!
Well That's all for my Double Double Boil and Trouble this Year!
Dream Big!
Sorianna
Photo Credits : Eva Quinquinio and Bobby Choate

 Here is another item I am getting ready to list in my shop, sculpted owls with Swarovski crystal eyes. I coated them in a pearl powder. I have been busy working on lots of new ideas and projects to come. As well as new updates and changes to the Canvas!